
With Reading Receipt statistics in Classic, you can easily track which users have acknowledged reading documents and which have not.
You can track Reading Receipts for an individual document or multiple documents at the same time. By combining statistics with filtering, grouping, and notifications, you can get a clear overview of Reading Receipt progress across different parts of your organisation and easily remind users about documents they have not yet acknowledged.
This is particularly useful for quality managers, department managers, and others responsible for ensuring that employees have read important work instructions, procedures, and controlled documents.
This article explains how to access and use Reading Receipt statistics, filter and group the information, and send reminders to users.
Requirements
To access Reading Receipt statistics, you must have the profile setting Access to Reading Receipt Statistics.
Reading Receipt also requires users to be concerned by the documents and the Reading Receipt requirement to be enabled. Read more about how this works in the article Concerned by and Reading Receipt in Documents.
Access Reading Receipt statistics
You can access Reading Receipt statistics in two ways, depending on whether you want to track an individual document or multiple documents at the same time.
Reading Receipt for an individual document
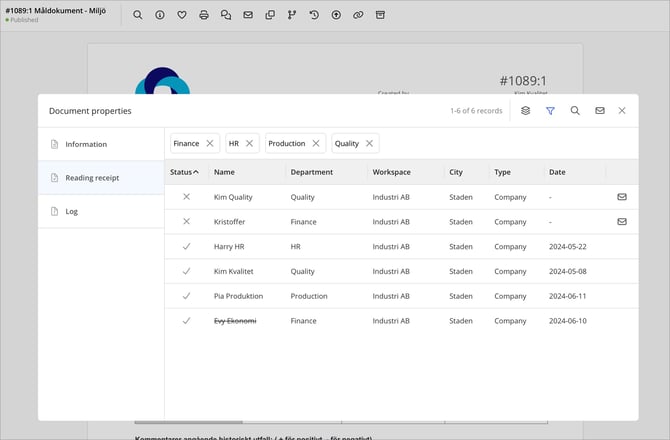
To check which users have acknowledged reading a specific document, open the document and select Show Properties (i).
Statistics for the current document are displayed under the Reading receipt tab.
Here you can see which users have acknowledged reading the document, which have not, and how many Reading Receipts are still outstanding. You can also filter, group, and send reminders directly from this view.
Reading Receipt for multiple documents
To track Reading Receipts for multiple documents, use the search function in Documents.
- Go to Documents » Search » Search Documents.
- Enter the search criteria that determine which documents should be included in the follow-up.
- Click Run query to perform the search.
- Open the Reading Receipt statistics from the search results.
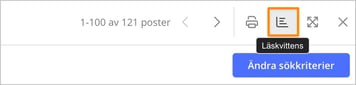
For example, you can search for documents within a particular category, business area, or other relevant criteria. Read more about searching for documents in the article Search Functions in Documents.
To view statistics for all published documents, leave the search criteria empty.
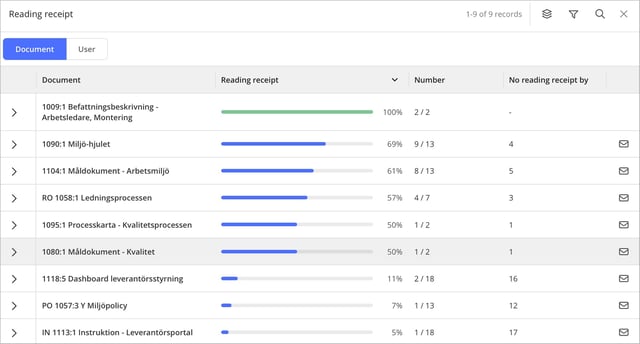
The statistics are based on the documents included in the search results and can be displayed from two different perspectives: Documents and Users.
Document view – track Reading Receipts by document
The Document view displays all documents included in the search results.
For each document, the following information is displayed:
| Information | Description |
|---|---|
| Document | Document number, edition, and name |
| Reading Receipt | Percentage of completed Reading Receipts, with a visual indicator |
| Number | Number of completed Reading Receipts compared with the total number required |
| Reading Receipt missing | Number of users who have not yet acknowledged reading the document |
| Notification | Option to remind users with outstanding Reading Receipts |
You can sort the list by its columns, for example, to identify which documents have the lowest percentage of completed Reading Receipts.
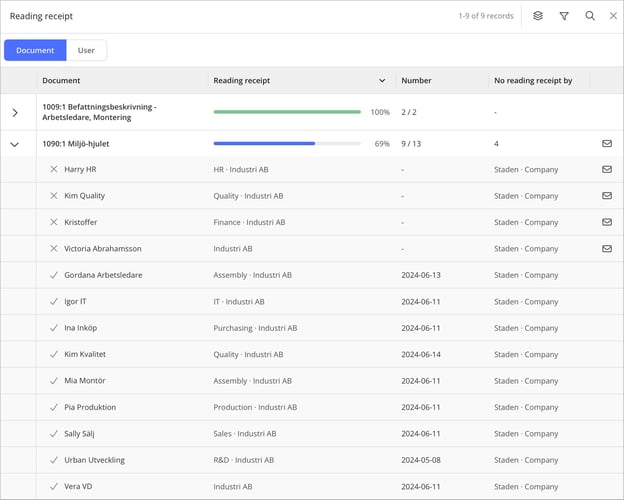
Click the arrow to the left of a document to expand its row.
This displays all users who are required to acknowledge reading the document, along with their Reading Receipt status.
- Check mark: The user has acknowledged reading the document.
- Cross: The user has not yet acknowledged reading the document.
- Date: Shows when the Reading Receipt was recorded.
Information about each user's organisational affiliation is also displayed.
For users who have not yet acknowledged reading the document, an envelope icon allows you to send an individual reminder.
User view – track Reading Receipts by user
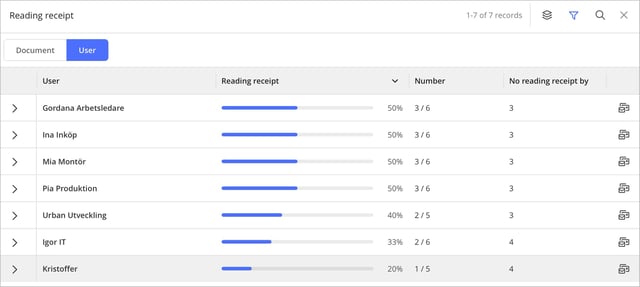
The User view provides a summary for each user.
This makes it easy to see each user's progress in acknowledging the documents included in the search results.
For each user, the following information is displayed:
| Information | Description |
|---|---|
| User | User's name |
| Reading Receipt | Percentage of documents the user has acknowledged reading |
| Number | Number of completed Reading Receipts compared with the total number required |
| No reading receipt by | Number of documents the user has not yet acknowledged reading |
| Notification | Option to remind the user about all outstanding Reading Receipts |
This list can also be sorted by each column.
example, you can easily identify which users have the most outstanding Reading Receipts. From this view, you can also notify a specific user about all documents they have not yet acknowledged reading.
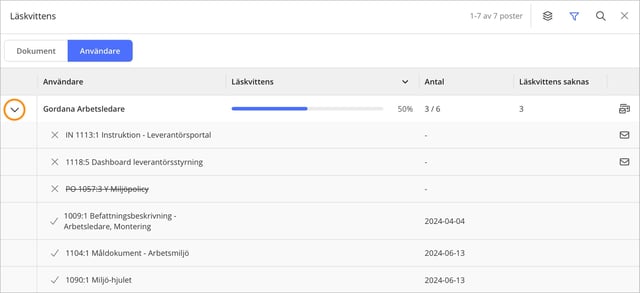
Click the arrow to the left of a user's name to see all documents that the user is required to acknowledge. Documents that have not yet been acknowledged are always displayed first, followed by documents that have already been acknowledged.
For completed Reading Receipts, the date when the acknowledgement was recorded is displayed.
You can also send an individual reminder about a specific document directly from the list..
Filter Reading Receipt statistics
The filtering feature allows you to limit Reading Receipt statistics to users belonging to a particular part of your organisation.
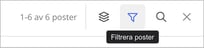
Click the filter icon (funnel) in the upper-right corner of the Reading Receipt overview.
You can filter by the following properties:
- Department: For example, Production, Administration, or IT.
- Workspace: One or more specific workspaces.
- Location: Based on the locations where your organisation operates.
- Type: Workspace type, such as Company or Unit.
You can select multiple options within each filter.
How does filtering affect the statistics?
Filtering is always based on users' organisational affiliation. For example, if you filter by the Production department, the statistics will only include users belonging to that department. This applies regardless of whether you are using the Document view or the User view.
-
In the User view, only users in the selected department are displayed, along with their Reading Receipt statistics.
-
In the Document view, statistics are displayed for the documents, but the numbers and percentages are calculated only for users belonging to the selected department.
This allows you to track Reading Receipts for a specific part of your organisation without the statistics being affected by other departments.
Example: Track Reading Receipts for a specific department
If you want to track Reading Receipts for the Assembly department, select Assembly in the Department filter. The statistics will then show completed and outstanding Reading Receipts only for users belonging to that department.
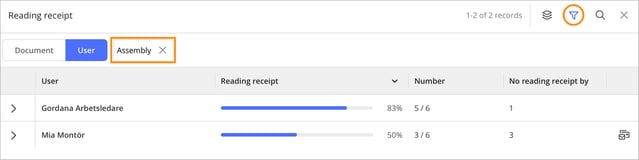
You can then choose to display the statistics by document or by user, depending on the type of follow-up you want to perform.
Group Reading Receipts by department or workspace
To make it easier to track Reading Receipts at an organisational level, you can group the statistics by Department or Workspace.
Click the grouping icon, which looks like several stacked layers, in the upper-right corner of the Reading Receipt overview.
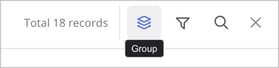
There are three options:
- None: Displays statistics without grouping. This is the default setting.
- Department: Groups statistics by users' department affiliation.
- Workspace: Groups statistics by users' workspace.
Grouping works in both the Document view and the User view, but the information is presented differently.
You can also send a combined reminder to users within a particular group who have not yet acknowledged reading the document. Read more about this later in the article under Send notifications about outstanding Reading Receipts.
Gruppering fungerar både i dokumentvyn och användarvyn, men informationen presenteras på olika sätt.
Du kan även skicka en samlad påminnelse till de användare inom en viss grupp som ännu inte har läskvitterat dokumentet. Läs mer om detta längre ner i artikeln under rubriken Skicka aviseringar och påminnelser.
Grouping in the User view
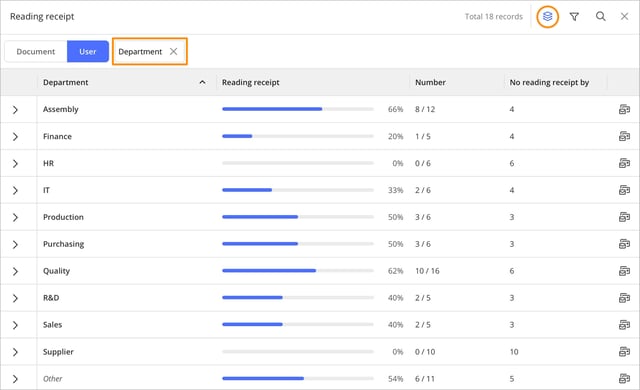
When you group the User view by department, for example, a summary is displayed for each department instead of a list of individual users.
For each department, the following information is displayed:
- Percentage of completed Reading Receipts.
- Number of completed Reading Receipts.
- Total number of required Reading Receipts.
- Number of outstanding Reading Receipts.
- Option to send combined reminders.
This makes it easy to compare Reading Receipt progress between different departments.
Users without a department
Since Department is not a required field, some users may not belong to a department. When grouping by department, these users are automatically included in the Other group. Other is therefore not a department, but a group containing users who have no department affiliation.
Grouping in the Document view
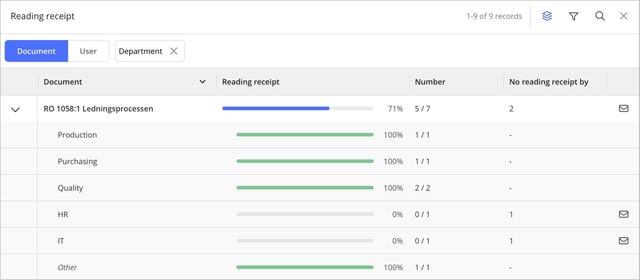
When you group the Document view, the documents included in the search results are still displayed. However, when you expand a document, individual users are no longer listed. Instead, the departments or workspaces containing users who are required to acknowledge reading the document are displayed. For each group, you can see how many Reading Receipts have been completed and how many are outstanding. For example, this allows you to check whether a particular work instruction has been acknowledged by employees in Production while also comparing the results with other departments.
Grouping by workspace
Grouping by workspace follows the same principle as grouping by department. Instead of summarising Reading Receipts based on department affiliation, the statistics are grouped according to users' workspaces. This can be particularly useful for organisations that use multiple workspaces to structure their operations.
Combine filtering and grouping
You can use filtering and grouping at the same time. This allows you to perform more specific follow-ups, particularly in organisations with multiple departments, locations, and workspaces.
The difference between the two features is:
- Filtering determines which users are included in the statistics.
- Grouping determines how the statistics are summarised and presented.
Example: Track departments within a workspace
Suppose your organisation has multiple workspaces and you want to track Reading Receipts for departments within a specific workspace.
- Search for the documents to include in the follow-up.
- Open the Reading Receipt statistics.
- Filter by the relevant workspace.
- Select Department as the grouping option.
The Reading Receipt statistics are now displayed by department, but only for users belonging to the selected workspace.
This makes it easy to identify which departments have completed their Reading Receipts and where further follow-up is needed.
Send notifications about outstanding Reading Receipts
IThe Reading Receipt overview provides several options for sending notifications to remind users about documents they have not yet acknowledged reading. Which users receive a notification depends on where in the overview you choose to send it.
Remind users about a specific document
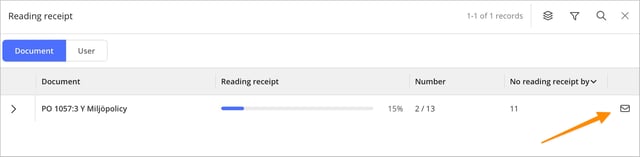
In the Document view, an envelope icon is displayed to the right of each document. Clicking the icon allows you to create a notification for all users who have not yet acknowledged reading that document.
You can also expand the document and send an individual notification to a specific user.
Remind a user about multiple documents
In the User view, an icon showing multiple envelopes is displayed to the right of each user. This icon is used to create a combined notification covering all documents in the search results that the user has not yet acknowledged reading. The notification contains a search query that brings these documents together. This means you do not need to send a separate reminder for each document.

Remind an entire department or workspace
When you group Reading Receipt statistics by department or workspace, you can send combined reminders to users within each group. With a single click, you can create notifications for users in the group who have outstanding Reading Receipts. The reminders cover the documents in the search results that each individual user has not yet acknowledged reading.
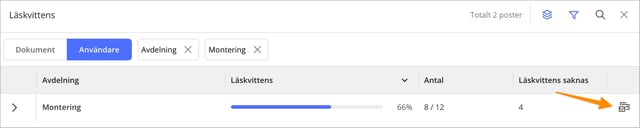
Remind a department about a specific document
In the Document view, you can combine a document's Reading Receipt statistics with grouping by department or workspace. You can then choose to send a reminder to users within a specific department who have not yet acknowledged reading the document. This is useful when, for example, a work instruction needs to be followed up within a particular part of the organisation.
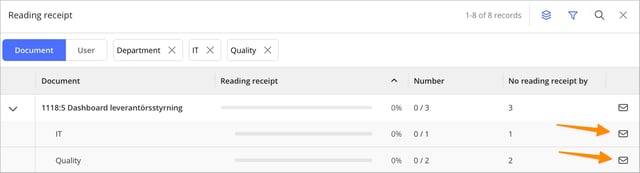
Important information about notifications from the Reading Receipt overview
Notifications from the Reading Receipt overview can only be sent to users who have not yet acknowledged reading the relevant documents. If you want to notify a user about a document even if they have already acknowledged reading it, you can use the notification feature when viewing the document. Read more: Notify relevant users and alert users about specific documents.
Why are some documents and users shown with strikethrough text in the Reading Receipt overview?
In the revision settings, you can enable the Hide documents when revision is overdue feature. This automatically hides documents from users once their revision date has passed. However, exceptions apply to creators, approvers, users responsible for revision, category managers, and users with Override Access. These users can still access the documents so that they can carry out the revision.
Even when a document is hidden, the Reading Receipt requirement remains in place, along with information about previously completed Reading Receipts. The document therefore remains visible in the Reading Receipt statistics, but is displayed with strikethrough text to indicate that the user no longer has access to it.
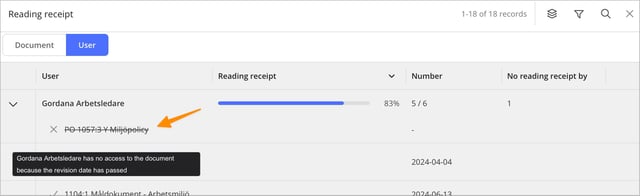
Since the user cannot open the document, individual Reading Receipt reminders cannot be sent. Documents hidden due to overdue revision are also automatically excluded from combined notifications. When this happens, an information message indicates how many documents have been excluded.
Example: How a department manager can track Reading Receipts
Suppose a department manager is responsible for ensuring that employees in Production have read and acknowledged relevant work instructions and safety procedures. By combining search, statistics, filtering, grouping, and notifications, the follow-up can be completed in a few simple steps.
Step 1 – Search for relevant documents. Go to Documents » Search and use the search criteria to find the documents you want to include in the follow-up. For example, you can search for documents in the Work Instructions and Safety categories.
Step 2 – Open the Reading Receipt statistics. Once the search is complete, open the Reading Receipt overview. Select the Users tab.
Step 3 – Group by department. Select Department as the grouping option A summary of Reading Receipts for each department is now displayed, based on the documents included in the search results.
Step 4 – Review the results. Check how many Reading Receipts have been completed and how many are still outstanding in Production. If necessary, you can also use filtering to narrow down the statistics further.
Step 5 – Send a combined reminder. Click the notification icon for the Production department. You can now create a combined reminder for employees who still have documents to acknowledge. Each user receives information about their own outstanding Reading Receipts within the selected documents. This means the department manager does not need to review every document and user individually to track progress and send reminders.
Tips for working efficiently with Reading Receipt statistics
Use saved search queries for regular follow-up. If you regularly track Reading Receipts for the same documents, saving the search query can be useful. This allows you to quickly return to the same selection of documents and access up-to-date Reading Receipt statistics. For example, this is useful for a department manager who regularly needs to track work instructions within their area of responsibility.
Adapt the follow-up to your organisation. Use filtering and grouping to display the information relevant to your organisation. A quality manager may want to compare Reading Receipts across several departments, while a department manager may primarily need to track employees within their own department.
Use combined reminders. If a user has several documents they have not yet acknowledged reading, you can use the combined notification feature instead of sending a separate reminder for each document.This simplifies follow-up and gives recipients a clearer overview of what remains to be done.
Check organisational affiliation. Since filtering and grouping are based on users' organisational affiliation, it is important that information such as department, location, and workspace is correct. If a user has no department affiliation, they will appear under Other when the statistics are grouped by department.