Background
In this article, we explain how to use triggers for conditional events in Cases – whether you want to send messages, create new cases via triggers, or trigger outgoing webhooks. You will learn how to control when a trigger should occur (When) and how to refine the logic with additional conditions (If), for example by basing triggers on field values, status, dates, or lead times, and combining multiple conditions with AND or OR.
❗️ Note that triggers for conditional events are not activated when a case is copied using the Create copy of case function.
Once you have installed and named your addon, you need to configure when a message should be sent. These so‑called triggers consist of two parts:
-
when something should happen
-
if additional conditions must be met.
1. Activated when
In the Activated when section, you define what in the form should trigger an addon. You can select one or multiple options per condition.
❗Note: If you add multiple When conditions (using Add new), the message will be triggered as soon as any of the added conditions is met.
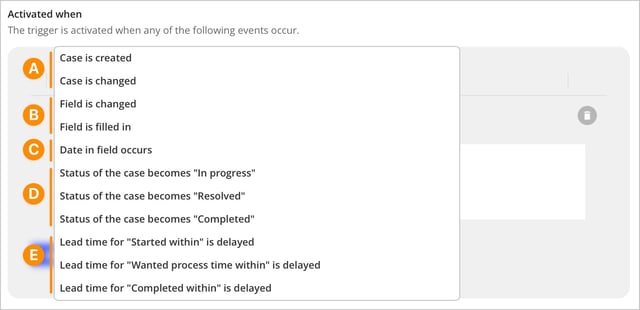
A. When a case is created or changed
Select this option if you want a trigger to run when a new case is created or an existing case is updated. If you want an addon to trigger whenever anything happens in a case, select both Case is created and Case is changed as triggers. This is useful, for example, if you always want to send all information via an outgoing webhook to collect data and visualize your cases in Microsoft Power BI.
B. When any of the fields is changed / filled in
You can also trigger an addon when a field is changed or filled in. Here, you select which field and which event in the form should trigger the addon. The fields that can be used as triggers are:

The main difference between Field is changed and Field is filled in is:
- Field is changed is triggered as soon as a field’s content is set, modified, or removed.
- Field is filled in is only triggered when a field changes from having no value to having a value. To trigger it again, the user must first remove the value in the field and save the case, then enter a new value and save the case again.
| Fieldtype | Field is changed | Field is filled in |
| Common input fields (Text field, Email, Date, Time, Number, Slider, Barcode, Google Maps, etc.) | Triggered when a value is set, changed, or removed. | Triggered only when the field changes from empty » filled in. No trigger on change or removal. |
| File and image upload | Triggered on every change: new upload, additional files/images, removal. | Triggered only when the field changes from empty » contains at least one file/image. No trigger when more files or images are added or removed, or when the field is completely emptied. |
| List fields with single choice (List, Persons, Radio list, Yes/No/N/A) | Triggered when an option is selected, changed, or deselected, regardless of which value it is. | Triggered only when the field changes from no selection → a selection. No trigger when switching between values or when the value is deselected. |
| Checklist | Triggered on every change in the checklist (checking/unchecking). | Triggered when the checklist changes from empty » at least one selection. No trigger when more values are added or when a value is unchecked. |
Specific values in list fields
In addition to being able to react when any option in a list field is selected, changed, or deselected, you can now create triggers that respond only when specific values in a list field are changed or filled in.
Triggers based on specific values make it easy to automate the right next step. For deviations, you can, for example, let an addon send a notification to management or responsible roles as soon as the user selects a value indicating that the deviation is critical or of a type that should be escalated. This enables faster and more consistent handling of serious incidents.
For complaints, you can use the same logic to move the process forward. When the user selects a specific outcome – for example that a return is required or that a replacement delivery should be sent – an addon can automatically create a new case for the next step, such as return handling or follow-up actions. This provides clear traceability and shorter lead times.

-
For the field types List, Persons, Radio list, and Yes/No/N/A, this means that the trigger can be tied to one or more specific values being selected (and for the option Field is changed, also when values are switched or cleared).
- For Checklists, you can also combine the selected options with OR or AND:
- OR: the trigger runs if any of the selected options is affected.
- AND: the trigger runs only if all of the selected options are affected.
| Fieldtype | Field is changed | Field is filled in |
| List fields with single choice (List, Persons, Radio list, Yes/No/N/A) | Triggered when a specified value is selected or cleared (the value is deselected or another value is selected). | Triggered only when a specified value is selected and the field changes from no selection » the specified value. (Not when switching between values, and not when the value is cleared.) |
|
Checklist - OR |
Triggered if any of the specified values is selected or cleared (the value is deselected or another value is selected). | Triggered if any of the specified values changes from not selected » selected. |
| Checklist - AND (all options) |
Triggered only if all specified values are selected or cleared (the value is deselected or another value is selected) at the same time, i.e. when the case is saved. This can involve a mix where some values are selected and others are deselected. | Triggered only if all specified values change from not selected » selected when the case is saved. |
C. Date in field occurs
The Date field comes with a few extra options. You can control both when the notification should be sent in relation to the selected date and whether it should repeat. This means you can, for example, create reminders before a meeting, follow-ups after a certain date, or recurring notifications until a case is closed.
 You can choose to send the notification a certain number of days before or after the selected date. If you enter the number 0, the notification is sent on the exact date. For recurring notifications, you can set an interval (for example every 7 days) to send the notification regularly, and also specify how many times it should be sent.
💡 Tip: We recommend combining repeating notifications with an IF condition (as described in this article) so that reminders stop being sent once the case has reached the status Closed.
❗️Note: The option Date in field occurs is not available when using the addon New case. It can only be used with the addons Send message or Outgoing webhooks.
D. Case status becomes In progress / Resolved / Completed
Use these conditions when you want an addon to be triggered as soon as a case is given a specific status – for example when a case moves from Registered to In progress, or from In progress to Resolved or Completed. In this way, you can automatically send messages, start follow‑up workflows, or forward information to other systems exactly when the case changes phase in the handling process.
By controlling triggers based on status, you reduce the risk of manual errors – for example that someone forgets to inform a customer or internal recipient when a case has been resolved. You can also use different statuses to create different types of notifications, such as an internal reminder when something is marked as In progress, and an external message to the customer when the case is marked as Completed.
You configure the rules that determine when a case changes status under the Settings tab in the form.
E. Lead time is delayed due to Started within / "Wanted process time within / Completed within
These conditions are useful when you want an addon to be triggered as soon as a specific lead time has been exceeded – that is, when the case has not reached a certain status within the time frame you have defined in your lead time settings. In this way, you can automatically catch delayed cases, send reminders to responsible users, inform the customer about delays, or forward data to other systems for follow‑up. This helps you keep better track of your response times, meet internal or external processing time requirements.
The lead time settings that apply are configured in each form under the tab Advanced » Automate & Integrate » Lead times.
❗️Note: The option Lead time cannot be used as a trigger for the addon New case.
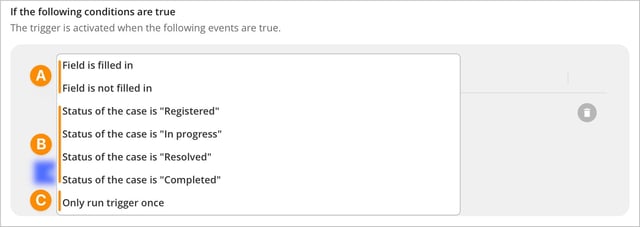
2. If the following conditions are true
Configuring If the following conditions are true is not required to create a trigger, but it can be very useful when you want to define more precisely whether a trigger should run. This means you can always let your When‑conditions control that something should happen, and then use If‑conditions to refine the logic – for example, to avoid sending messages when the case is already closed, or to ensure that a new case is only created when specific fields have been filled in.
💬 Under If the following conditions are true, you can add multiple conditions within the same rule. If you have more than one condition, you need to decide whether it is enough for just one condition to be met, or if all of them must be met for the trigger to run. You control this by choosing AND or OR between the conditions, and you can switch between them by clicking directly on AND or OR.
If you choose AND, the trigger will only run if all specified conditions are met.
If you choose OR, it is enough that at least one of the conditions is met for the trigger to run.
A. Field is filled in / not filled in
Use this condition when, for example, you only want an addon to be triggered if the user has actually filled in a specific field, or conversely – if the field is empty and therefore requires an action.
❗️ Note: You can’t select a specific option in a list when using Field is filled in / not filled in as an If condition. This is only possible with the options Field is changed and Field is filled in under Activated when.
B. Case status becomes Registered / In progress / Resolved / Completed
These conditions are useful if, for example, you only want an addon to be triggered when a case has the status Registered. You can advantageously combine the statuses Registered, In progress and Resolved to avoid sending messages once a case has reached the status Completed. You can read more about this and see an example in this article.
C. Only run trigger once
If you use this setting, the selected trigger will only run a single time, even if the configured parameters occur again. This is useful if you only want an addon to be triggered the first time something happens.
💬 Under the If conditions, you can add multiple options within the same condition by using AND or OR via the Add new button. Switch between the two by clicking directly on AND or OR.
-
If you select AND, the trigger will run only when all conditions are met.
-
If you select OR, the trigger will run when at least one of the conditions is met.
Common mistakes
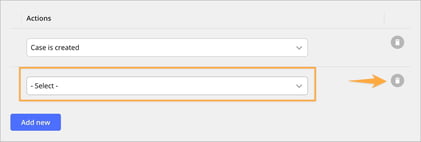
-
A common reason your addon does not work is that you have added a row with a When or If condition without making an active selection – meaning the “– Select –” option is still shown. In that case, you need to either choose a valid condition or remove the row. It is possible to save your addon without selecting a condition, but then the system does not know what to do, and the message cannot be sent.