Overview
With the Addon – New Case, you can automatically generate a new case in the same or a different form, including selected information from the source case. Everything is seamlessly managed by defined conditions, known as triggers. This feature is designed to streamline workflows.
The feature is available in each form under Advanced » Automate & Integrate » Addons, and can be accessed by users with permission to edit or modify forms as well as by administrators.
What’s new in AM System version 6.2.022
- It is now possible to transfer data from person fields when creating a new case—even if the source and target forms are different. For example, you can specify a responsible person directly in the new case.
Please note that the system does not verify whether the person you include has access rights to the new case in the receiving form. This means an individual who normally cannot be selected in a person field during manual case registration may be added through the New Case function. Since access can be determined by a person's involvement in a case, this may allow individuals to gain access to cases they otherwise would not be able to view.
Groups cannot be transferred when the source form and the target form are different.We’ve also enhanced the capability to include form information and metadata—such as case number, form name, and other fields—when creating a new case. This improvement increases traceability and makes it easier to automatically transfer all essential information during case registration.
Feature Limitations
There are important considerations when using the New Case function, relating to both the types of information that can be transferred from the source form and the functional restrictions in the receiving form.
The source form can:
- transfer form information, metadata, and most field types from any section.
- can transfer information from repeating fields.
However, this information cannot be sent to a repeating field in the receiving form. Instead, it must be mapped to a standard text field, not to another repeating field.
Another option when working with repeating fields is to let the system create a new case for each instance in the repeating field. For this to work, the trigger must be placed inside the repeating field. The trigger will then run separately for each instance where the conditions are met. If a form contains several instances in a repeating field, the system can therefore create a new case for each of them. This is an efficient way to split information from multiple repeated entries in one form into separate cases in another form.
You can also include information that lies outside the repeating field in the new case. For example, you can transfer the original case number from the case that triggers the creation of the new case, which makes it possible to follow and track the relationship between the cases.
- only send information från the field types List, Checklist, and Radio List if the source and target forms are the same.
The receiving form can:
- can only receive information in the first section.
- cannot receive data in repeating fields.
Additional notes:
- You can create multiple Addon – New Case automations per form if needed.
- The creator of the new case will be recorded as "Addon – New Case."
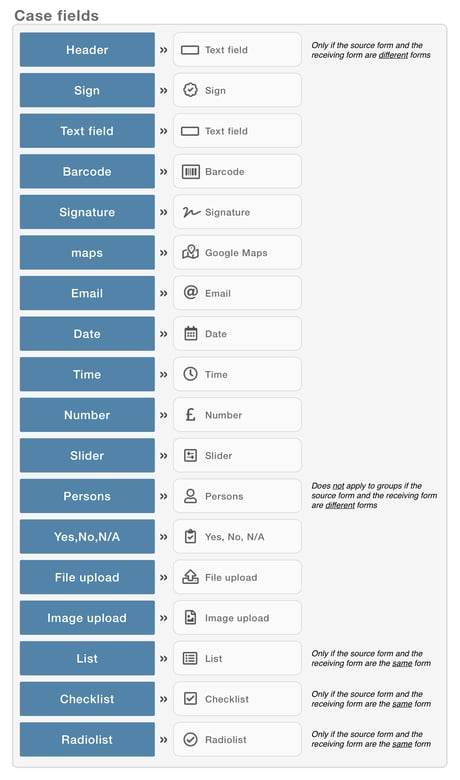
The following metadata and field types can be used to transfer information.
The blue rectangles indicate the available sources you can select within a form. To the right, you’ll see which field types are eligible to receive information from each source. For example, a Reg. date can be transferred to the target form and stored in either a date field or a text field.

Create an Addon – New Case
Access this function in each form under Advanced » Automate & Integrate » Addons. Start by creating a new addon of the type New Case and naming it. Next, define:
- when a new case should be created
- in which form it should be created
- and which information should be included
1. When should a new case be created?
After installing and naming the function, you need to configure a few settings that determine when a new case should be created. These so‑called triggers are divided into when (When) and if (If).
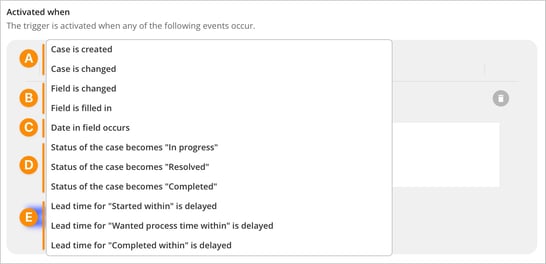
Activated When (When)
In the Activated When section, you choose which events in the form should trigger a message to be sent—for example, when a case is created or updated, when specific fields are changed or filled in, when a date occurs (with options for reminders before/after and for repetition), when the case status changes, or when lead times are exceeded. You can add multiple conditions, and the message will be sent if any one of them is met.
For more details about these triggers, see the article Triggers for conditional events.
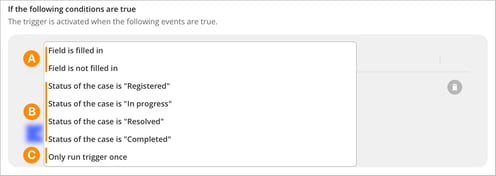
If the following conditions are true (If)
Configuring If the following conditions are true (If) is not required to create a trigger, but it is very useful when you want to define more precisely whether a trigger should run. Here you can, for example, require that certain fields are filled in, that the case has a specific status, or that the trigger should only run once. You can also combine several conditions using AND or OR.
For more details about these triggers, see the article Triggers for conditional events.
2. In which form should the new case be created?
Once you’ve set when a new case should be generated, the next step is to choose the form where the case will be created. You can select either the same form that triggered the event or a different form.
Note:
- You can only transfer information from the field types List, Checklist, and Radio List if the receiving form is the same as the source form.
- If the source and receiving forms are different, you can choose to transfer a Heading field to a text field in the receiving form.
- To create a new case in the receiving form, the form must be active and not archived or deactivated.
3. Which information should be included in the new case?
Finally, select which fields to transfer from the source case and specify their target location in the new case. Refer to the list above to see which field types can be chosen and where each type can be mapped.
Make your selections field by field: start by clicking Add, then select a field from your source form under From and choose the destination field under To. Blue fields are selectable, gray fields indicate incompatibility, and red fields show the field has already been chosen and is not available.

After specifying which information you want to include in the new case, save your addon by clicking Install or Save. The addon becomes active only after the form is saved.