In each form, you can find this function under Advanced » Automate & Integrate » Addons. Under the Addons button (2), you will see the available triggers. Select and install Send Message.

💬 There is no limit to the number of Message Addons you can install, allowing you to customize multiple unique messages based on what needs to be sent and to whom, all from the same form.
Creating a Message
After installing and naming the function, you need to configure a few settings that determine when a message should be sent. These so‑called triggers are divided into when (When) and if (If).
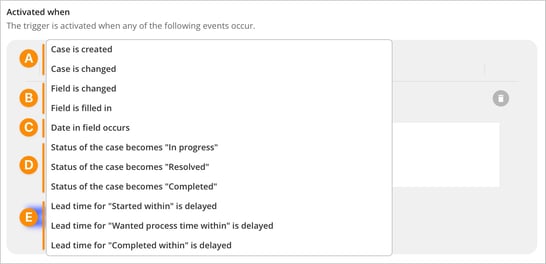
1. Activated When (When)
In the Activated When section, you choose which events in the form should trigger a message to be sent—for example, when a case is created or updated, when specific fields are changed or filled in, when a date occurs (with options for reminders before/after and for repetition), when the case status changes, or when lead times are exceeded. You can add multiple conditions, and the message will be sent if any one of them is met.
For more details about these triggers, see the article Triggers for conditional events.
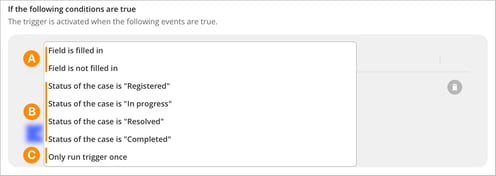
2. If the following conditions are true (If)
Configuring If the following conditions are true (If) is not required to create a trigger, but it is very useful when you want to define more precisely whether a trigger should run. Here you can, for example, require that certain fields are filled in, that the case has a specific status, or that the trigger should only run once. You can also combine several conditions using AND or OR.
For more details about these triggers, see the article Triggers for conditional events.
3. Send message to
You can choose between two options to determine who the message should be sent to.

This option makes the message recipient dynamic, meaning the message is sent to the individuals specified in the current case based on the selected field.
💬 Tip:
In addition to choosing Person fields, you can also select the field type Email. These notification messages are sent to the specified email address.
⚠️ Note that these notifications do not include a link to the current case since the recipient is not expected to have a user account in the system. You can read more about how to do this in this article.
If you select more than one field, you also need to specify whether the notification should be sent to all selected fields or only to one of them. This is controlled by choosing AND or OR between the fields.
-
With AND, the notification is sent to all selected fields, provided that the message add-on is triggered.
-
With OR, the notification is sent only to the first field that contains data, and the selection is made from top to bottom – that is, in the order in which the fields were added.
The Users Tab
This option sends the message to specific users or groups with access to the form. Use this option when you want the same users to always receive the notifications.
In the message, you can create a subject line and write a custom message. Additionally, you can choose to include values from the form in both the subject and message fields to clarify the context of the case.
Field types and metadata for subject and message sections include:
| Field types | Metadata |
|
|
❗Note that it is not possible to include values from field types located in repeating fields, regardless of the field type.
Languages
If your form supports multiple languages, we recommend completing both the subject and message fields in each language. The system automatically sends notifications in the recipient’s preferred language. If, for example, the subject or message is missing in English, users with English selected will receive a blank notification.
Use the language drop-down to the right of the subject field to switch between available languages.
Show that the notification was sent…
If you choose to activate this setting, the person registering the case will see who has been notified once the case is saved.

Don’t miss!
- When you’ve installed your add-on and configured all the desired settings, make sure to finish by saving the form. If you skip this step, your new message triggers won’t be activated and no notifications will be sent, even if the configuration appears correct. Always double-check that the form is saved before you start using it in a live environment.
Related content:
- Triggers for conditional events
- We are missing notifications from the case. What could be the reason for this?
- Create Status Settings in Cases
- How to Forward Notifications to Your Email
- Why do some email notifications include a "Reply-to" address while others do not?
- Why is a direct link to the case not always included in certain types of notifications?
- Why are we receiving notifications for cases that are already completed?
- Is it possible to send emails from a case form to addresses that are not users in the system?