
Vad är ett API?
An API can be described as a way for two systems to communicate with each other.
Instead of someone manually logging in to Classic and searching for information, an external system can retrieve the desired data automatically. For example, this could involve transferring data about deviations, complaints, or improvement suggestions to another system for follow-up, analysis, or reporting.
The Read API for Cases is intended for read-only access. This means the API can be used to retrieve information, but not to create, edit, approve, or delete information in cases in Classic.
What can the Read API for Case Management be used for?
The Read API for Cases can, for example, be used to:
-
display information from Cases in another system, such as an ERP system, MES, BI tool, or internal portal
-
create dashboards that show cases by status in a specific form
-
track deviations, complaints, improvement suggestions, or other quality-related processes over time
-
search for cases based on, for example, registration number, date, status, submitter, form, or specific field values
-
retrieve information about an individual case, including field values and any attachments
-
follow up on cases linked to a specific person, department, workspace, or group
-
combine information from Cases with data from other systems for reporting in quality, production, or management
-
retrieve supporting data for recurring reports, such as monthly reports, management reviews, or supplier follow-up
Now available for testing
The Read API for Case Management is currently available as a test version. You can register your interest if you would like to test the API and evaluate how it can be used with your own systems and tools.
The API is free to use during the test period. Our ambition is to finalize the Read API and offer it as a standard service around the turn of the year 2026/2027. Pricing for the final service has not yet been determined and will be communicated closer to launch.
Registering your interest does not mean that the API will be activated immediately. Activation takes place by agreement with AM System.
If you have any questions during the test period, encounter any issues, or would like to share feedback or suggestions for improvement, you are welcome to contact us through our regular support channel. Your experiences help us further develop both the API and its documentation in preparation for the final service.
Activation
Once the Read API for Cases has been activated in your environment, an administrator must create an API key and then enable the integration for the forms that should be accessible through the API. This is done in two separate steps.
-
First, an administrator needs to create an API key for Case Mamangment. The API key is used to authenticate API requests and is shared across the forms that are made available through the API.
- Next, API access must be enabled separately for each form that should be accessible through the API. This means you control which forms external systems can retrieve information from. Forms where API access has not been enabled will not be available through API requests, even if the API key is valid.
💬 Note that the same API key is used for all forms where API access has been enabled. It is currently not possible to create different API keys for different forms. Access is therefore controlled by which forms are enabled for API access.
1. Create an API key for Cases
Once the Read API for Cases has been activated in your environment, a user with administrative permissions in Classic must first create an API key. This normally only needs to be done once, but it can be repeated if needed, for example if the key needs to be replaced for security reasons.
An administrator can create an API key for Cases in Classic by navigating to: Administrator » Settings » API » Cases. For security reasons, the key is shown only when it is created, so make sure to copy it and store it securely for future use. If you lose the key, or if you need to replace it for security reasons, you will need to create a new one. When a new key is generated, the previous key becomes invalid, which means that all integrations using the old key must be updated with the new one. It is therefore important to have a clear routine for key management, for example by storing the key in a secure location with restricted access and avoiding insecure communication channels.
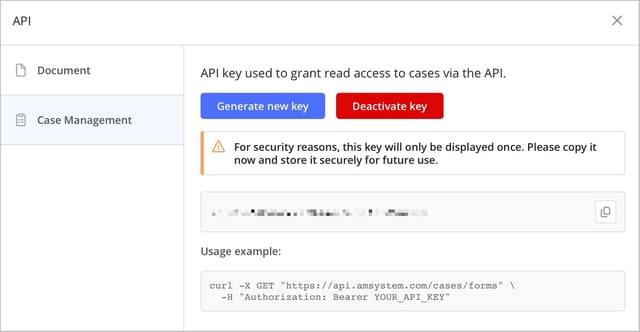
When a key is created, a notification is sent to the other administrators in your environment to inform them that an API key has been generated. The purpose is to create transparency and clearly indicate that there is now a key that provides access to Cases through the API. This supports internal oversight and helps you maintain a high level of security around access to Cases.
It is also possible to deactivate an API key. This may be relevant, for example, if the key is no longer being used, if you suspect it has been compromised, or if you want to restrict access to Cases through the API for a period of time for security reasons. When an API key is deactivated, all integrations using that key will stop working immediately until they are either updated with a new valid key or the existing key is reactivated. Deactivation is therefore an effective way to quickly stop unwanted traffic or temporarily pause an integration, but it should always be planned and communicated internally so that affected system owners and vendors have time to adapt their solutions.
Important information about the API key
Because the API key provides broad access, it is important to clearly define internally who is responsible for the key, where it may be stored, and which systems are allowed to use it.
- The API key should only be shared with people or systems that are authorized to use it.
- The API key should be treated as confidential information, in the same way as a username and password.
- The API key should not be sent through insecure channels or stored in places where unauthorized individuals may gain access to it.
- The API key should only be used in the systems and integrations where it is actually needed.
- If you suspect that the API key has been exposed to unauthorized parties, you should create a new key, which will invalidate the previous one, or deactivate the key.
2. Enable API access for specific forms
To enable API access for a form, you must first ensure that there is a valid API key for Cases in your environment. You then choose which forms should be exposed through the API and enable API access for each relevant form. To do this:
- Navigate to the relevant form.
- Open the Advanced tab, then click Addons under the Automate & Integrate section.
- If you already have other addons configured, first click More addons.
- Click Install on the API integration addon.
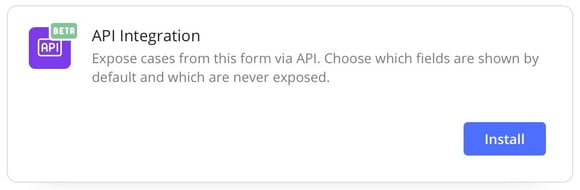
When the addon opens, you can enable API access for the current form. This means that cases from this specific form can be retrieved through the Read API for Cases.
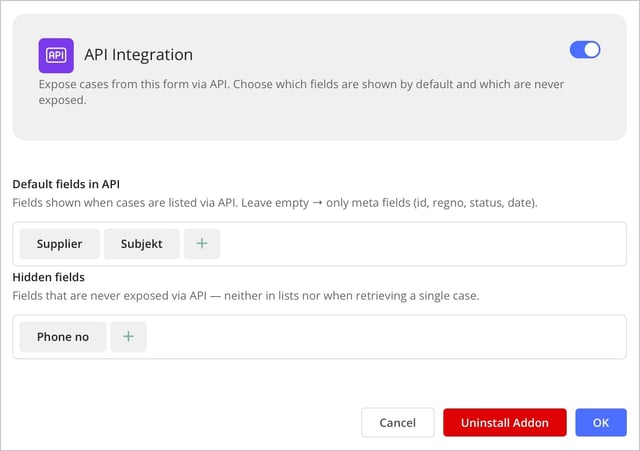
The dialog also includes settings for which fields should be exposed through the API.
Default fields in API
- Default fields determine which form fields are shown when cases from the form are listed through the API. You can think of these fields as the equivalent of Default fields in Query Builder, but for API requests. These might include fields that are important for overviews, reports, or dashboards, such as case type, priority, assignee, workplace, or other key fields used in your follow-up. If no fields are selected, only the case’s basic metadata is shown when cases are listed, such as form ID, case number, creator, registration date, and status.
- When a specific case is retrieved, all fields that are not marked as hidden are returned, even if they have not been selected as standard fields. This means you do not need to specify fields as standard fields for them to be available through API requests that retrieve an individual case. Those requests can still access all fields in the case, as long as the fields have not been marked as hidden in the Hidden fields setting described below.
Hidden fields
-
Here, you can choose which fields should never be exposed through the API. Information in fields added here will not be shown when the form schema is retrieved, when cases are listed through the API, or when data for an individual case is retrieved. This can be useful for fields that contain internal, sensitive, or otherwise irrelevant information for external systems, such as internal notes, personal data that is not needed for the integration, or information intended only for internal follow-up.
When the settings are complete, click OK to activate the API integration for the form. Repeat the steps above for any other forms you want to make available through the API.
Only forms where the API integration has been installed and activated will be available through the API.
Getting started with API requests
Once the API key has been created, it can be used by the integration or external system that will communicate with Classic.
The technical implementation normally needs to be handled by someone in your organization who works with IT, system integration, or development. This could, for example, be an internal IT department, a system vendor, or another technical partner.
The technical API documentation provides more information about how to make requests, what data can be retrieved, and how the API responses are structured.