Preparations
To edit existing published templates, manage and categorize templates, and create and publish new templates, you need the profile setting Edit and publish templates. You can learn more about these profile settings here.
Note: It is not possible to create a template from a previously published document; you must use a document that has never been published or create a new document. If you have a document that is published and you wish to make it into a template, you must first use the Duplicate function (found in the document menu) to create a new draft.
Working with templates
Creating a New Template
-
Navigate to Documents » My Documents and select Create new document. (If you already have a draft of a document that has never been published, you can use that draft as a template. Then navigate to the draft and skip to step 4.)
-
Choose between a text document, layout document, or create a bundle where you can include both text and layout documents depending on your needs.
-
Create the content for your template.
-
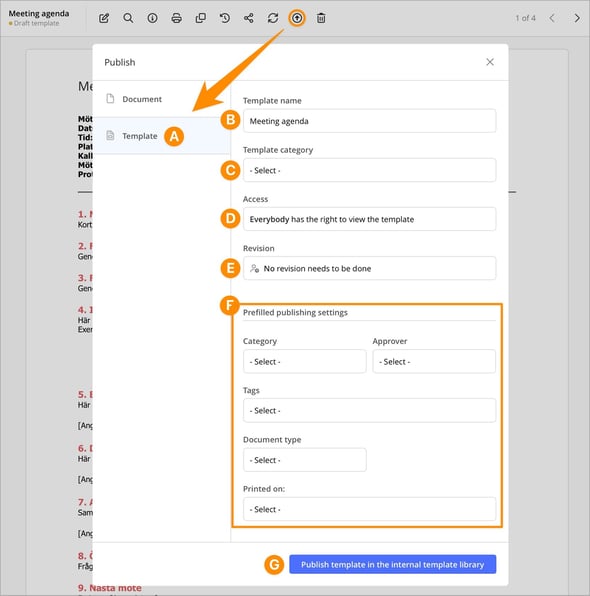
Once you are satisfied with the content, select Publish from the menu, but instead of publishing the document, choose the "Template" tab on the left column (A).
- Next, you can change the template name (B) and choose which template category (C) it should be published in. If you do not specify a category and template categories already exist, the template will be saved under “Uncategorized.” Then define who should have access to the template (D) and whether the template should be subject to revision (E). You can also configure prefilled publishing settings (F), such as a default category and approver for documents created from the template.
- Publish the template by selecting Publish template in the internal template library (G). The template will then be available to all users with access to it.
Template categorization
By categorizing templates, it becomes easier for users to quickly find the correct template when creating a new document. Categories create a clearer structure, reduce the risk of using the wrong template, and make it easier to distinguish between, for example, work instructions, procedures, policies, and control-related documents. This is particularly valuable when the organization has a large number of templates or when several departments share the same management system.
To create, edit, or move documents between different categories, go to Documents » My Documents, select Create new document, and then click the Internal template library tab. Here, you get a consolidated overview of all internal templates and their categories, making it easier to build a clear structure and maintain order as the number of templates grows. In addition, every user can collapse or expand each category to hide or display its contents, which provides a clearer view when working with many templates at once. Your personal settings for which categories are open or closed are saved per user, so the next time you open the template library, the categories will appear exactly as you left them.
Users with the Edit and publish templates profile setting can, at this stage, manage the template categories. To create a new category, click New category, give the category a name, and save it. Typical examples include categories such as “Work instructions,” “Procedures,” “Policies,” or department-specific categories, depending on how you want to structure your management system.
To move templates between categories, use the drag-and-drop function: select the template, hold down the mouse button, drag it to the desired category in the list, and then release. This allows you to quickly reorganize the library when new needs arise or when you want to make it easier for users to find the right template.
You can also change the order of template categories by moving them up or down in the list via the settings (gear) icon for each category. This is useful if you want to highlight categories that are used frequently, such as templates related to audits, deviations, or critical processes. The order of the list influences how users perceive the structure when they create new documents from a template.
You can also delete a template category when it is no longer needed. If the category contains templates at the time of deletion, these are automatically moved to the Uncategorized category, ensuring that no templates are lost. Afterwards, you can review the templates in Uncategorized and reassign them to more appropriate categories to maintain a clear and easy-to-navigate structure.
 |
Edit an existing template
-
Navigate to Documents » My Documents and select Create new document.
-
Go to the Internal template library tab, choose the desired template, and click on Edit this template.Create a new edition and make your changes.
-
Select Publish from the menu. Make any changes under prefilled publishing settings and choose Publish Template in internal template library.
Archive a Template
-
Navigate to Documents » My Documents and select Create new document.
-
Go to the Internal template library tab, choose the desired template, and click on Edit this template.
-
Archive the template by selecting Archive from the menu.
Create a document from a template
There are two ways for users to create a new document based on a template in AM System. Users can either manually select a template from the Internal Template Library (1), or administrators and content managers can embed direct links to document templates within both text and layout documents (2).
1. Create a document from any template
-
Navigate to Documents » My Documents and select Create new document.
-
Go to the Internal template library tab, choose the desired template, and click on Use this template.
💬 Tip: Under the AM System template library tab, you’ll find sample process maps and text documents that you are free to use for reference and inspiration.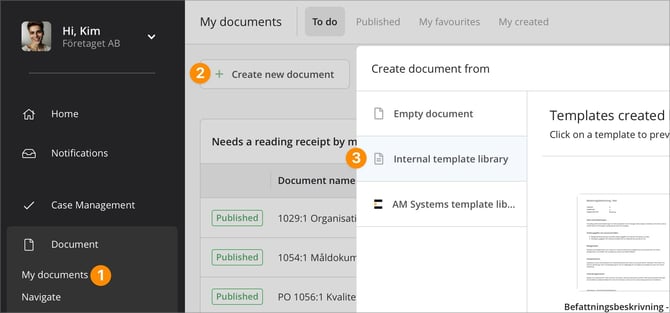
2. Link to a specific template from a text or layout document
By embedding links to specific templates in text or layout documents, users can generate new documents from the correct template directly within the workflow. This streamlines the process, reduces the risk of errors, and ensures the right structure and content are applied from the start.
- Create a new document or navigate to an existing one. If no draft version exists, start a new draft.
- Select the element you want to link to the template. This can be text or an image in a text document, or text, image, or another object in a layout document..
- If you are working in a text document, select Insert Link. In a layout document, choose Edit Link. Then, select the option to Create new document from template.

- Click Select to open the template selector. Choose Internal Template Library if you want to link to one of your organization’s templates. Select the appropriate template and confirm by clicking Use this template. Tip: You can also create a link to a document in AM System’s template library or to a new blank document.
- Click OK, then save and publish the draft.
Tip: When a user clicks on text or an object linked to a template, a new draft is automatically created from the selected template. Consider informing users about this in the document to prevent any misunderstandings.