Introduction
|
Users can access the settings they can modify by clicking on their name or profile picture located at the top of the main menu (1), and then selecting the My Settings option (2). The My Settings section is divided into two menus: About Me and Settings. Below is a summary of the features available under each heading. |
 |

1. About Me
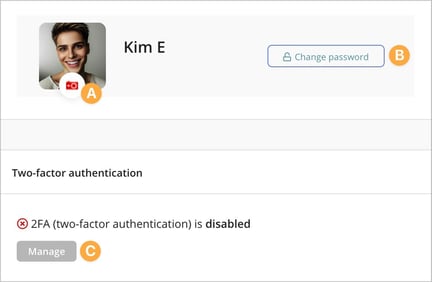
A. Avatar
By clicking on the red camera icon, you can upload, remove, or change the profile picture displayed when you log in. This image is used in various modules, such as the Case Management Module, where it appears in user fields, and the Document Module, for example, during review rounds.
B. Change password
Click on the Change Password option if you wish to update your password. To change your password, you must first enter your current password.
Your new password must be at least eight characters long, cannot be the same as your previous password, and must not contain parts of commonly used passwords.C. Two-factor authentication
If an administrator has Enable two-factor authentication under My settings for user setting, which can be found under the Administrator » Settings » Password/Security, each user has the option to configure 2FA through this setting. To begin the activation process, click on Manage and follow the provided instructions. You will need an application to generate your 2FA codes; popular choices include the "Authenticator" apps available from Google or Microsoft.
Once 2FA is set up, only an administrator can disable this feature. For more information on this, please refer to the relevant documentation here.
Please note that the Change Password and Two-Factor Authentication features are unavailable if the user is connected to Microsoft Entra ID (formerly Azure AD) as these functions are managed within Microsoft's environment.
2. Settings
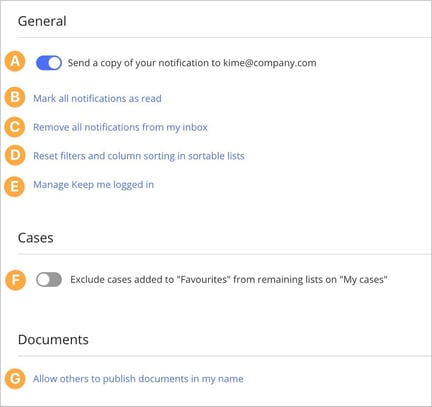
General
A. Send a copy of your notifications to
Enable this feature if you would like to receive a copy of all notifications sent within the system to your email address. For more information about this feature, please refer to the relevant documentation.
B. Mark all notifications as read
If you have a large number of unread notifications in your inbox, you can use this feature to mark all notifications as read at once.
C. Remove all notifications from my inbox
If you wish to delete all incoming notifications from your inbox, you can do so here. Please note that this action will not affect notifications in your outbox.
Be aware that this action is irreversible; if you have opted to send a copy of your notifications to your email, the links in those emails will no longer function after you delete the notifications.
D. Reset filters and column sorting in sortable lists
This option allows you to reset the filters and column sorting in sortable lists, such as search results and the lists found under My Cases.
E. Manage Keep me logged in
This feature allows you to view and delete previously saved login sessions. For more information about this functionality, please refer to the relevant documentation.
Cases
F. Exclude Cases Marked as "Favorites" from Other Lists on "My Cases"
As a user, you have the option to hide cases that you have marked as favorites from the lists displayed under My Cases. Please note that this setting will only be available if you have access to the Case Management module.
Document
G. Allow Others to Publish Documents on My Behalf
This feature enables you to decide whether other users can publish documents in your name. For more information about this functionality, please refer to the relevant article. Note that this setting will only appear if you have access to the Document module.