Inserting a Table of Contents in Text Documents
It is easy to insert a table of contents in Text Documents, and you can choose to present it in two ways. The function can be found in the second row of the menu bar.
In the menu of the text document, you will find most of the tools needed for creating a document. Additional features that are not displayed in the first row can be accessed in the second row of the menu.
You can reveal these options by clicking on the three dots (A), indicating that more functions are available. To insert a Table of contents, select the option represented by the three lines (B).

❗Please note that if you use uppercase letters in your headings, the system will take this into account when generating the table of contents.
Preparation
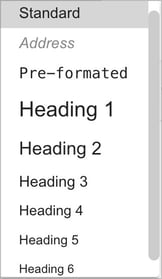
 Before you can use the feature, you must first highlight the sections in the document that will serve as headings and determine their respective levels. You can select the heading level from the first row of the menu under the Standard option (C).
- Standard, Address, and Pre-formatted are three text styles that you can customize for your site under the Documents » Settings » Global formatting for text documents section.
- You can utilize heading levels 1 through 6 for your table of contents.
Insert Table of Contents
Once you have created the headings that will be included in your document, select the option to insert a Table of contents (B). You can choose from three formats: None, Standard, or Numbered. The table of contents will then appear below the document's header, with each heading clickable, allowing readers to easily navigate to the corresponding section in the document.

